Mobirise Version 5 Template [10/24/2020]
DELETE THIS "BLOCK" OF INSTRUCTIONS AFTER YOU START EDITING THIS "TEMPLATE" WITH "MOBIRISE".
Steps To Get Started Creating Your Own Webpage/Website
1. Create a single-slide Powerpoint file called about-me.pptx
2. Then, in Powerpoint, save that same Powerpoint slide as a png image file to create about-me.png
3. Save those files on your computer for now. Below, when you see a reference to a folder called 5678, it refers to your course number. So, please rename the "5678" folder to the course number of your course. If this course is not CURR 5018, please edit the course title in the menu section at the very top of this page. This tutorial is a "template"; that means you will edit this as you wish. Your webpage will evolve. Some of you may want to add webpages, making what you are now editing a "website" (a website is a collection of linked webpages). Some of you may want to add different blocks. That's all OK. Just realize that blocks DIFFER in functionality; for example, there are some blocks that do no allow you to add images.
Excellent!
4. On your computer, create a folder called "Digital Publishing Kit". Then, you will download a "zip" file that contains free software applications including the free "FTP" software called WinSCP. WinSCP software only works on the Windows operating system; Mac users might want to consider borrowing someone's PC to use this "portable" software. "Portable means that the software can run directly off of a USB flash drive without installing anything on a computer's hard drive. If you are a Mac user and only want to use to rely on Mac software, please purchase "FTP" software called "Transmit" and contact your instructor to get more information about how to use it.
Here's the link to the "Digital Publishing Kit" "zip" file, for Windows users:
https://ulm.edu/webguide/publishing-kit/Digital-Publishing-Kit-Version-AH.zip
5. After you download the "zip" file, "unzip" or "extract" it in the same folder. Then, delete the zip file; you don't need it anymore.
Great!
6. Learn how to use "Mobirise", a free website builder, by watching these video tutorials describing Version 4 of Mobirise:
https://ulm.edu/webguide/video-tutorials-for-using-mobirise.html
As of October 24, 2020, we will use Version 5 of Mobirise. Newer video tutorials will be made available. In the meantime, do watch the previous video tutorials, the difference is not that large.
7. As you watch the video tutorials, download and install the free Mobirise software application (Windows or Mac) on your computer. Here's the link: mobirise.com/history.html
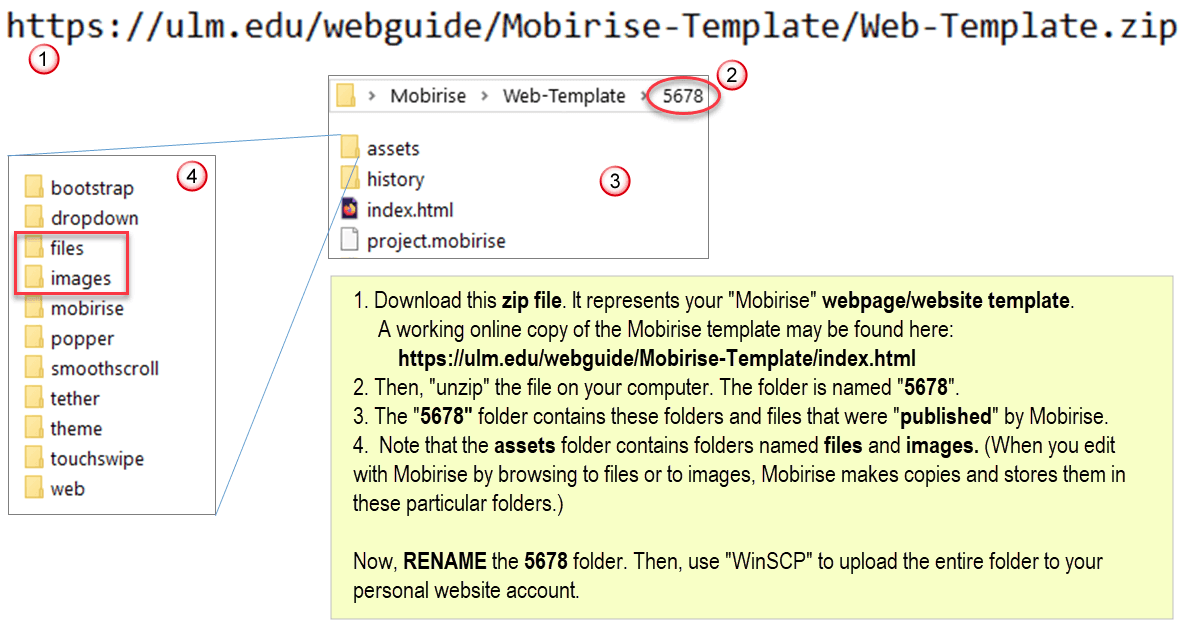
8. Next, download and "unzip" a copy of this updated October 2020 Mobirise website template: into the 5678 folder.
https://ulm.edu/webguide/Mobirise-Template/Web-Template--10-2020.zip
9. Run Mobirise. Move your mouse over the "hamburger" icon located in the upper left of your screen (the "three horizontal line" icon is referred as a "hamburger" icon).
A pane will slide open up. Click on "Sites".
Another pane will slide open. Click on the link inside the first grey box that includes the small linked text "Import Mobirise Site". Click on that smaller text link. Then, browse to the "unzipped" Mobirise website template that you have in the 5678 folder. Select the project.mobirise file and then click on the Open button.
After some seconds of activity, the template will appear in Mobirise. Please edit the webpage template by typing in your nae in the menu section and updating the current date. Mobirise automatically saves your work for you.
Excellent!
10. It's now time to "publish". You will need to publish EVERY TIME you want to revise your webpage/website. Click on the "Publish" button in the upper right of your screen. A window will open with options. Select "Local Drive Folder"; that means somewhere on your computer drive or USB flash drive. Then, browse to your folder called 5678. It's a good idea to use a blank folder when you are starting. Then, browse to that blank folder of your choice. Then, click on the "Publish" button. In a moment, Mobirise will "publish" to that selected "local folder".
Again: This is a 2-step process EVERY TIME YOU MODIFY YOUR WEBPAGE/WEBSITE:
Step 1: Edit in Mobirise. Then, publish in Mobirise. At a minimum, Mobirise creates a folder called assets, a file called index.html, and a file called project.mobirise
Step 2: Use your FTP software application ("WinSCP" for Windows users and "Transmit" for Mac users) to copy, at a minimum, the folder called assets, the file called index.html, and a file called project.mobirise to your network account. For ULM students, the actual website folder is called public_html because anything you copy into the public_html folder will be on the Internet. If your course number is 5678, you will use your FTP software to create a folder called 5678 inside the public_html online folder.
11. Examine the "local folder" where you "published" with Mobirise. You will find, at a minimum, a folder called assets, a file called index.html file, and another file called project.mobirise inside that folder; they represent your webpage/website and will work when you copy them into the special online folder located on your own network account. For ULM students, that special online folder is called public_html
12. Open and run the WinSCP.exe application on a Windows computer. (If you only use a Mac, you'll need to use a commercial software product called "Transmit".) An FTP application is used for "file transfer" between your computer and your network account as if your network account is connected to your computer.
Now, click HERE to check a section in the online "Webguide" reference to see how to set up your "FTP" session.
13. Use your session settings in WinSCP to access your network account. For ULM students, immediately click on the public_html folder displayed in the right column; that column represents your network account. When you open the public_html special folder, you are SAFE and won't be able to affect "the other critical settings and folders" of your network account. It's important to note that changing or "messing with" any of the settings in your network account will result in a frustrating formal process to request your institutional network account to be reset. That process can take a week or longer. During that time, you may not be able to access Moodle or your ULM email. Avoid the hassle! As a habit, always open the public_html folder as a professional habit!
14. Use WinSCP to upload the assets folder, the index.html file, and the project.mobirise file inside the 5678 folder that is located inside of the public_html folder of your network account.
Fabulous!
15. You can provide a direct Internet address to your online files. Below, EDIT the link to your own Internet address for this course. Replace "yourlogin" with your own ULM login. Replace "5678" with the course number of your particular course. Then, actively link to your own file called about-me.pptx".
Here are examples of "linked" files:
Two-Words-To-Avoid-And-Two-Words-To-Remember.pdf
about-me.pptx
vpdr-05.pptx
When the Mobirise "published folder and files (the assets folder and the index.html and project.mobirise files) are "uploaded/copied" inside of the 5678 folder of your student website account, the direct links to the online files will be:
http://warhawks.ulm.edu/~yourlogin/5678/assets/files/Two-Words-To-Avoid-And-Two-Words-To-Remember.pdf
http://warhawks.ulm.edu/~yourlogin/5678/assets/files/about-me.pptx
http://warhawks.ulm.edu/~yourlogin/5678/assets/files/vpdr-05.pptx
REPLACE "yourlogin" with your own login.
REPLACE "5678" with the course number of your course.
Mobirise makes it extremely easy to link to external locations on the Internet or to any of your own files on your own website. Notice that you need to use the COMPLETE Internet address when you create active links to external locations. You can see some examples about the pattern for Internet addresses when you use Mobirise -- MAKE SURE TO READ "OPTION 2". In this course we will always refer to "Option 2" because we are using Mobirise.
Throughout the course, create links from this webpage to your online files, like assignments, visual professional diary reflections (VPDRs), and any files you create for your course project.
It's OK to make mistakes! That only means that you are learning!
So... use Mobirise to delete, add, edit, and arrange any "blocks" that you like!
GREAT! It's worth repeating: It's a 2-part process to get your webpage/website online:
Step 1: Edit the template in Mobirise and then "publish" to a "local folder" on your computer hard drive or to a flash drive.
Step 2: Use "WinSCP" (if you use a Windows computer) or "Transit" (if you use a Mac computer) to copy/upload the assets folder, index.html file, and the project.mobirise file to the 5678 online folder that you created inside of the public_html folder of your network account. These are the settings for using the free WinSCP "FTP" application: https://ulm.edu/webguide/index.html#info1-nj
DIRECTLY BELOW, DELETE the outdated block. Even through it is already outdated, it provides an idea how the assets folder works. Instead of copying "the entire folder", just copy the published assets folder, index.html file and the project.mobirise file inside of your 5678 online folder. This is all described in this video tutorial [1:10:30]:
https://www.screencast.com/t/BqlgxinR
Yes, watch the video. it describes how to edit this webpage by using your own files. When you update your online webpage/website, publish your changes in Mobirise to a local folder. Then, use an FTP application to copy the those 3 published "objects" (the assets folder, index.html file, and the project.mobirise file) inside of your 5678 online folder, That's how to edit your webpage/website; everything will work!

EDIT THIS... REPLACE IMAGE AND CHANGE THE LINK...
Edit the image link to your online "about-me.pptx" file:
http://warhawks.ulm.edu/~yourlogin/5678/assets/files/about-me.pptx
REPLACE with your own caption.

EDIT THIS... REPLACE IMAGE AND CHANGE THE LINK...
Edit the image link to your online "vpdr-05.pptx" visual professional diary reflection file. The URL will be:
http://warhawks.ulm.edu/~yourlogin/5678/assets/files/vpdr-05.pptx
REPLACE with your own caption.

Words that start with "C". (Interactive audio.)

Sample active link to an interactive audio reading application.

Words that start with "D". (Interactive audio.)
The external URL is
https://www.ulm.edu/aceadventures/alphabet/ai1/d/

A sample file describing a project.
The URL is:
http://warhawks.ulm.edu/~yourlogin/5678/assets/files/project.pptx
Throughout this course, create links with Mobirise to your own files using linked images. Whenever you do that, Mobirise automatically stores your files in a folder called assets that includes another folder called files. Your images are stored in the images folder. When you "publish" to a local folder Mobirise updates the assets folder to automatically include your own files.
You can link to any of your own online files by using an image that links directly to your file. You can create your own "captured images" with "Snagit" as "png" image files. When you "publish", Mobirise provides you with at least 3 "objects" of content (the assets folder, index.html file, and the project.mobirise file) that you copy/upload into your 5678 online folder that you created inside of the public_html folder of your network account.
Is it important for you to NAME all of your own files properly in a special way to avoid unanticipated errors? YES. Please read this to avoid the most common mistake and hours of frustration: https://www.ulm.edu/webguide/index.html#info1-np
When you "publish", your files, like documents, presentations, spreadsheets, or any other type of files, will be included when you upload the assets folder to your online website account. Yes, include every week your latest "visual professional diary reflections" (VPDRs), and any other changes you made for your webpage/website for your course project.
SUMMARY
1. Replace YourFirstName YourLastName with your own name in the top left of this webpage. Also, edit the date. Replace 5678 with the course number of your course.
2. In the upper right of this webpage, feel free to edit and create "menu items" as you like, as needed. They are optional; you can turn them "off" if you want. Or, you can add to them. It's your choice.
3. What's important? Be able to access your own online files located on your ULM website account.
4. Modify the menu as you like.
5. Add your other content as you like... every week.
Q. Can I be flexible in how I edit and design my webpage/website?
A. Yes, of course.
Q. Should I delete the blocks except for the block with the two pictures...?
A. Yes. You can do that. You can be very flexible. It's your choice.
Q. If I want, can I copy and use similar blocks?
A. Yes, of course. It's really up to you.
Q. Can I use this template to create multiple linked pages?
A. Yes. That's optional. Mobirise makes it easy to do that with the "clone" option. Then, you can use Mobirise to link from your webpage to another webpage. The "home page" is named index.html
Q. Is it OK to just create images that link to websites that exist on the Internet?
A. Please don't "just link to websites". That has NO context! Please link to your own online files. Your own online files can then link to anything on the Internet... with context that provides meaning.
Mobirise web creator - More